Monday, April 26, 2010

Fatiniza shoots her 1st Music Video "Out of Control" - Behind the Scenes


Colombian pop-rock bombshell Fatiniza, with whom I recently shot in Oman for her Debut Album, has just filmed her first music video for the single release "Out of Control" ... and I have been fortunate enough to have been her makeup artist.

Not only is Fati an amazing vocalist whose self composed lyrics touch your body, mind and soul, but moreover is she a true artist in everything she does from the moment she wakes up until she finally falls to bed late at night. As is typical for overwhelmingly creative persona with a mind that never sleeps, people surrounding them must be flexible and able to improvise. Hence, I pretty much packed everything I own as a Makeup & Hair Stylist to head for the filming.

Being that Fati has this incredibly creative mind, she challenges me as a makeup artist to come up with innovative concepts and accepts nothing but perfection (sometimes she seems only little Colombian and very German - no offense, I am German - I can say that).


Fatiniza has incredible attention to detail and working with her it can happen ... it regularly happens ;) ... that 3 pairs of exactly the same fake eyelashes are rejected because they are clearly unworthy of identical twin status ... "Sey are not se same, see se hair here" she mimics my German pronunciation ... and right she is, they are unworthy of going on stage.
So, last Friday after much anticipation and carefully selected sets of eyelashes it was finally time to shoot Fatiniza's music video for her debut single "Out of Control" at Dubai's creative hub "The Fridge". Her album including the single will go on sale at Virgin Megastores at the end of May 2010.
It was a looooong but amazingly memorable day in my life. I will post the video shortly ... here are some teaser images from the day.


Check out Fati singing "Out of Control" live in the recording studio. Now available at Virgin Megastores! Congrats Fati!


Photo credit: Nick Feraru

OK! Magazine Gucci Jewelry Beauty Shoot - "How to" Makeup for Beauty shoots


Last month I had the privilege of collaborating with OK! Magazine Middle East sporting Gucci's new collection of jewelry, shot by the amazing Candy Kennedy and modeled by the beautiful Militza from Bareface (who had just arrived from London - a fresh face to keep your eye on).


DESIGNING THE LOOK FOR THE SHOOT

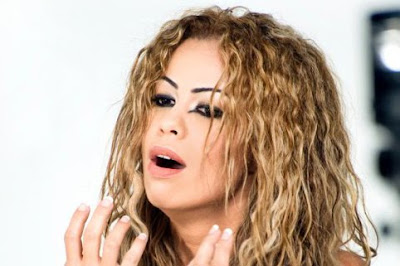
The look and feel of the shoot was intended to be "traditionally elegant, simple yet beautiful and clean for a strong yet soft woman". I wanted to bring out the incredible jewelry with the makeup and support its statement of bold brave elegance by creating a symbioses between the makeup and the jewelry.
When designing looks for shoots I generally receive a brief from the Fashion / Beauty Editor of the Magazine, in this case the lovely Melanie Penny, Fashion & Beauty Director of OK! Middle East. She had sourced images of bronzed beauties which she showed me about a week before along with a short brief explaining that she and her client were seeking a golden look.

Whilst for Makeup Artists published beauty shoots are such an honor, it's really important to not get carried away trying to show off your talent. Always keep in mind that, unless you have been hired to sell makeup products, the look you have designed must support the product you are advertising, meaning every decision you make must add to the client selling the specified product.
So, yeah, it would have been great to go stronger on the blush or add a fantastic looking lip colour, but would it have helped sell the jewelry any better ... probably not, most likely it would have overpowered any other elements in the shot.


TIPS & TRICKS FOR BEAUTY SHOOT MAKEUP

Doing beauty shoots (i.e. close-ups of the face) demands great attention to detail from the Makeup Artist. There is no room for error, if your line is not straight - it's not straight, it's there for everyone to see "up-close" - your ugly crooked line with your name printed on the same page ;)
When I do makeup for beauty shoots, I always take 3-5 minutes at the end of the makeup session to double check all makeup elements. During this time I polish and perfect.


Here are a couple of things I check just before the model starts shooting:

- under eye coverage sufficient
- symmetry of all elements (lips, eyes, brows, blusher, lashes)
- straight eyeliner on top of eye
- coverage of waterline liner, making sure inside corner of eye is clean of any residue
- highlighting polish (bridge of nose, arch of brow, above brow, innner corner of the eye, cupid bow, top of cheekbones, around the mouth)


Now that you know some of the "beauty makeup" tricks - make this look your own!
Here is how:


FACE

(1) Prime your skin with "Prep + Prime Skin Base Visage" from Mac (you need this to help your foundation adhere to your face and increase its longevity).

(2) Use Chanel's "Vitaluminiere" foundation (in your skin color), which is a coverage building foundation and powder (to set the foundation) with Makeup Forever's translucent "HD Powder". Don't skip the powdering step, it is vital to prolong the life of your foundation on your skin.
For this photoshoot I used "RCMA" creme foundation on Militza, a highly pigmented full coverage foundation created for the sole use of photography makeup, which was designed by a group of Professional Makeup Artist in LA. Unfortunately it is not available in the UAE.

(3) Add colour to your face using Mac's blusher in "Peaches" on the apples of your cheeks blending up/backwards and "Coppertone" blusher to contour just below your cheekbone (no further inwards than the outer corner of your eye).

(4) Finish with my all-time favorite Dior Bronze Collagen Activ in "Amber" by applying only little where the sun would naturally tan your face (forehead, chin, cheekbones). I always use the "Bobbi Brown Face Bronzer" brush for this kind of bronzing to guarantee a natural finish. Do not sweep it over the nose unless you are going for a slightly clown-like appearance.


EYES

(1) Use Illamasqua's Liqid Metal in "Solstice" (available at Bloomingdale's Illamasqua counter in Dubai Mall) all over the lid and blend out and upwards. Apply the same underneath the eye - from the outer to the inner corner. You are doing this to create a base which will later intensify your eyeshadow colours and increase the longevity of your eye makeup.

(2) Then take a metallic warm golden eyeshadow (I used Inglot AMC shine 27) and apply all over the lid, take the same golden eyeshadow and apply underneath from your inner corner 1/2 down towards the outer corner. Now intensify the crease of your eye with a metallic brown (Inglot AMC shine 42 was my choice). Blend well in circular motions to make sure you have no harsh lines.

(3) Take the same metallic brown eyeshadow and apply underneath your eye from the outer corner 2/3 inwards towards your inner corner.

(4) Take Bobbi Brown's liquid gel liner in "jet black" and draw a beautifully shaped line just above your lashes.

(5) Using DUO eyelash adhesive (available at Mac) apply your stunning new lashes from Girls Aloud's Cheryl (available at Carrefour and Spinneys Al Wasl) to open up your eyes, making sure to avoid a droopy eye by placing the lashes close to the inner corner of your eye. If you feel they are giving your eye a sad expression, cut off a little from the inner corner of the fake lash until you feel that the lashes are giving your eye an upward movement at the outer corner.

(6) Line your eyes' waterline top and bottom with Mac's amazing kohl liner "Smolder".


LIPS

(1) In this case I only used a lipliner and a clear lipgloss to keep the focus on the eyes and allow the jewelry to take centre stage. Choose either Mac's "Subculture" or "Spice" as your nude lipliner and fill in the entire lip. For this shoot I used "Subculture" because it just about matched Militza's natural lip color.


Et Voila ... off you go sporting your new fabulous jewelry looking gorgeous! Easy!


Monday, April 19, 2010

Fly me to the moon! - the new Nail trends from the catwalk


Have you noticed the influx of high-art nails in magazines and fashion spreads lately? Does that mean sparkly metallics, graphics, and photo-quality designs on the tips of our fingers are finally accepted? Yes, it does, so don't be shy and start sporting some funky nails!

When I saw this season's new Nail trends coming straight off the runway, I was literally over the moon. With Makeup & Hair inspirations from the 1920s and 1940s being witnessed on many of the Fall 2009 runways ... it comes as no surprise that Burlesque and Vintage fashion has also influenced current nail trends. Finally we have an alternative to our "Immortelle bien-aimee" French Manicure.


The "Half Moon Manicure" (also called "Reverse French") has me in thrall. Sure it's got shades of Gatsby, but the look can be aggressively postmodern too. The trick is to choose a dark plummy or jet color in a high lacquered gloss. My favorite by far is a white moon with black lacquer.
I head to Tips & Toes in the Greens regularly to have their amazing nail artist Jenibeth "fly me to the moon".

Of course, Dita Von Teese, the queen of vintage glamour and patron saint of moon manicures, has been flashing her lunar nails for years.


As a makeup artist I love when I am given the opportunity to design all beauty elements of a shoot - Hair & Makeup & nails & any skin decorations. Agreed, it's a lot of work but ever so rewarding when everything comes together.

It's a given that I of course sported a "Half Moon" manicure at one of my last shoots ... it looked stunning - despite the glue-on nails flying all over the place with each dress change - our poor model Jovana from Bareface kept trying to collect them off the street and every now and then I still find a lonely half moon in my car.


As an alternative to nail lacquer I often revert to lacquer foils at shoots (if time is scarce or I am after strong sparkly metallics, golds or silver).
The ones most readily available here in Dubai are "Incoco - Dry Nail Applique" (Spinneys - Al Wasl) and "Sephora Nail Patches" (Sephora) - either one is great and I have no preference of one over the other, it purely depends on the color you are after.

At the "Girly Story" shoot, shot with my dear friend and photographer Billie Muller, I used Sephora's nail patches in "impeccable beige" and in this case the beautiful Cecily, our model from Bareface, actually applied the foils herself whilst I was doing her hair, the result was impeccable and saved us time which allowed the team to shoot a couple more frames.


The application of the foils is very easy. Use a tissue soaked with Isopropyl (available in any pharmacy) to wipe down your nails, select the shape from the nail strip that matches your nail best, peel off the backing, and smooth down onto each nail. Smooth down the strip with your fingers and file off the excess using a nail file. It’s quite simply, a cinch. No mess – means you can pretty much apply them anywhere, with no worries about spilling polish or messing up the result. You can apply over fakes and gels too, which is handy.


If all else fails you can always wear gloves ;)

Sunday, April 18, 2010

Picture of the Week


Shooting with the ever wonderful and truly committed Gulf Photo Plus crew in Abu Dhabi during a photography masterclass with world renowned photographer Joe McNally the students were challenged not only by sandstorms, falcons and incredible wind but moreover by "Mohamed". So, forget the fact that I initially started this blog to share my knowledge as a Makeup & Hair Stylist ... the first Picture of the Week must go to : "Mohamed - a horse with as diverse facial expressions as a top model".


To put this in perspective of those involved in the shoot, I present to you the masters of this photo.

Self-labeled: "Sheikh Numnuts and Sheikh Drew"

Thursday, April 15, 2010

A photo in the making ... demons of wind on our side for once


A couple of weeks ago I had a shoot in Oman with the incredible singer Fatiniza for her new album "Confusion". The creative vision for the shoot was strongly influenced by her songs, her character as well as plenty of brainstorming sessions with Dubai based Fashion Photographer Michael Kruger.

Fati, an "out of control", full of fire, totally lovable Colombian, has built her music on her Latin roots and International sounds. Her genre Rock/Pop based with Latin percussion thrown in the mix alongside Fatiniza's individual vocals creates a truly unique and new sound. Just this year she was nominated by Time Out Magazine as the "Best Band in Dubai".

She's awesome and the shoot was one of my favorite ever! If you work in the industry and are in Dubai, do head down to the Musandam Peninsula for a photoshoot one day ... it has been an unforgettable experience for me - oh, and don't forget to take me along :)

After a successful first day of shooting in the clear blue waters and incredible mountains of Oman, we headed to an equally beautiful Wadi near Khassab. The river bed had just dried up from the recent thunderstorms and the scenery looked out of this world.
For this last shot, the photographer wanted Fati wrapped in a 20m black photo backdrop cloth, hence adding to the mystical feel of the scenery. The idea was to have the wind play with the fabric and thus create abstract shapes (... and abstract they were!)
Having finished makeup and hair, it had been "made" my mission to persuade the wind to do the right thing at the right time. Easier said than done without a doubt.

To give you an insight into what incredible task lay ahead of me, check out what a 20m long black cloth can look like without a Makeup Artist and Pazuzu, the demon of the South-West winds (in Babylonian mythology at least).

Off we went praying for wind and wind we got!


I love stuff like this, you do the same thing over and over and over - throwing a black cloth in the air - yet each time you get a totally different result and all of a sudden, completely unsuspected, your heart stops and you realize that you hit the jackpot while you adore your "money-shot" on the little screen on the back of your camera. Sooo rewarding!

And after some post-production by the talented and very imaginative photographer Mike Kruger, this is the final result.


Fatiniza will be launching her new album "Confusion" on 28 April 2010 @ Alpha, Le Meridien Village, Dubai. Go check it out!


Tuesday, April 13, 2010

From Runway to Red Carpet ... CHANEL so close to you


I love Chanel's latest creation - Les Trompe L'Oiel de Chanel Temporary Skin Art.

This limited edition temporary "skin art" was designed for Chanel by their global creative director, Peter Philips, and recently shown on the Paris runway. Aren't they just gorgeous!

Now available here in Dubai exclusively at Harvey Nichols' Chanel cosmetics counter. AED 300 will buy you a pack of 5 sheets with 55 individual designs, which you can cut out and design as you like. Simply stick them on your skin, wet them with a watered sponge and slowly peel off. Then as the newly launched "Elle - Arab World" (p58) suggest, brush with a translucent powder (like Makeup Forever HD Powder) for a natural finish reducing the shine of your new skin art. They last about 2 days, and with prior exfoliation of the skin maybe a little longer.

I just got mine and am dying to use them at a shoot - calling all photographers :)


Do as Australian Top Model Lara Bingle does and wear them to an evening out instead of jewelry ...


... but refrain from sticking them in your face, unless you are at a photoshoot.


Head down to the newsstand and grab yourself the First Edition of "Elle - Arab World"! It's the newest fashionistas must-have for all information about Fashion & Beauty in the Arab World.

PRO TIP:
Don't attempt to stick these gorgeous tattoos on by yourself, get a friend to help you keep the stick-ons in place while you wet with a watered tissue/sponge. It is not all that easy as it looks. Do cut the single pieces as close to the actual tattoo as possible as to keep control over where exactly the tattoo will end up.

Latest Photoshoot: Construction & Glamour ... Or "how to spend 3 days making a hair sculpture"

Last week I had the pleasure of shooting yet again with the wonderfully edgy and incredibly creative Billie Muller.

Preparing for the shoot involved not only designing 3 distinctly different edgy makeup looks but also creating my first hair sculpture. Wow! Who would have thought that it could be so difficult ... not me, naively so! After searching the net for useful advice I discovered that the making of hair sculptures is the best kept secret of the industry!

Looking back I am more than happy that I had not promised the photographer an elaborate overly ambitious animal hair sculpture like the ones below from Nagi Noda or those staged during the recent Chanel Ready-To-Wear show, but had rather proposed an architecturally inspired form.


I embarked on a shopping spree to Jumeirah Beach Centre's Party and Crafts store, bought myself some large pieces of styrofoam and a saw ... hmmm, yup a "saw". Feeling more like a carpenter than a makeup artist & hair stylist I tried to map out the 3-dimensional shape on the overly large square piece of styrofoam I had purchased and started sawing away. Not an easy task!
Having achieved the shape that I had in mind, I spray painted the styrofoam black and started pinning ... and pinning ... and pinning ... and pinning ... and pinning hairpieces for about 2 days. Gelling profusely in between hair layers and drying with a hairdryer in between sessions. Finally, after 3 days and a studio full of hair and styrofoam, I finished.
"Never again" I say now ... knowing exactly that the next opportunity for a custom built hair sculpture is just around the corner. And you know what ... I can't wait! Seeing the photos, it was well worth making it myself.

Here is the result of the hard work. Shot by Billie Muller with the beautiful Jovana from Bareface as our model.


The second part of the shoot involved time-traveling back to the 1940s, wrap-braiding all of Jovana's hair and adding a, this time ready-made (thank you God for having given mankind the gift to mass-produce these), hairpiece.


If you would like to recreate this look, kit yourself out with these tools:
Foundation: RCMA; Lips: Mac lipliner in "currant", MacPro lipmix in "burgundy", MacPro clear gloss; Eyes: Bobbi Brown eyeshadow in "Espresso" and "Grey"; Eyebrows: Mac eyebrow pencil in "stud", Cheek sculpting: Mac blush in "taupe"; Highlighting: MacPro "Emphasize"

More Asian Eyelash Craze ... this time from Japan

I have been an avid (albeit silent) fan of the Japanese Harayuku culture all along ... being who you want to be on a particular day without constraints has always been something that I have admired. Wouldn't it be wild to walk through your hometown with everyone dressed up as an imaginary manga or cartoon character. Think of trying to digest so much creativity at once!

The Japanese Harayuku culture traces its root to the end of WWII when US soldiers and their families began to occupy an area of Tokyo known as Harayuku, an area where curious young people flocked to experience a different culture. Its apartments were quickly occupied by young fashion designers, models and photographers. A fashion culture so distinct began to develop that people frequently referred to it as the Harajuku-zoku or the "Harayuku Tribe", developing the region further into today's fashion mecca of Tokyo.
Whilst the fashion itself might not appeal to everyone, it is the attention to each intrinsic detail with which each and every piece of the costume, makeup and hair is created that is so beautiful to me.

Harayuku style varies considerably and there are many different looks ranging from elegant gothic to modern punk. To see the Japanese teen culture at its most intense, go to the Harayuku station on a Sunday.


Take just one distinct feature of the Harayuku culture and add it to one of your outfits or integrate it into one of your makeup designs. Maybe try one of these funky bottom lashes ...


I will definitely sneak a little Tokyo style into my next photoshoot, "Carnival" is the theme and I have been hired as the hair stylist for this shoot.

If you have a chance then grab yourself the latest copy of "Desert Fish" and have a look at what the ever so talented Shindesu and highly creative Lorna Butler dreamt up in their wonderful contributions. I am sure you will recognize a little Harayuku here and there.


Be brave, be proud, be different! And don't take yourself too serious.

Lashes available at: Takuya Angel webshop directly from the mecca of Japanese fashion